
In this article, we will address the common mistakes encountered when installing carpet tiles and how to avoid them. Indeed, this task, although seeming simple, can lead to complications if certain precautions are not taken. Thus, we will discuss the most frequent mistakes, the importance of proper preparation, the necessary tools, and the essential steps to successfully install them. Whether you are a professional or a hobbyist, this article will provide you with practical tips to ensure a flawless result.
Installing carpet tiles is often underestimated. Among the most common mistakes, there is a lack of preparation of the subfloor. Indeed, a dirty or uneven floor can severely affect the adhesion of the tiles. Moreover, failing to check the flatness of the floor can lead to lumps and an unappealing final appearance. Another frequent mistake is not allowing the tiles to acclimate before installation, which can affect their ability to stabilize once laid.
It is also common to use inappropriate adhesives for specific types of carpet. Additionally, neglecting temperature and humidity indicators can compromise the integrity of the tiles. Incorrectly implementing the installation method, whether it be tessellated or staggered, can also cause misalignment over time.
These mistakes, although common, are not inevitable. By taking the time to properly prepare the floor, choose the right materials, and use appropriate installation methods, you can avoid many issues. Thus, the right choice of tiles can not only enhance aesthetics but also extend their lifespan.
As we delve deeper into this article, we will review different ways to avoid these frequent mistakes to ensure that your carpet tile installation project is a success.
The first crucial step to avoiding mistakes when installing carpet tiles is to prepare the floor. It is essential to ensure that the surface is clean, dry, and free of debris. A poorly prepared floor can lead to inadequate adhesion of the tiles and affect the overall aesthetics.
Choosing the right tiles is also essential. You must consider the usage of the room, the tile size, and the type of appropriate adhesive. Improvising may lead to regret later, so pay attention to this choice.
Floor preparation is a fundamental step in installing carpet tiles, as it guarantees not only the adhesion of the tiles but also their durability. A poorly prepared floor can lead to irregularities, deformations, and even premature deterioration of the carpet tiles. For example, glue residues or leftover debris can prevent good adhesion, which may lead to unexpected lifting over time.
Moreover, a floor must be dry and free from moisture to avoid mold growth. Humidity can cause unsightly stains and reduce the lifespan of the tiles. It is thus essential to ensure that the floor has dried after cleaning or that there are no underlying leaks that could affect the installation.
Finally, checking the flatness of the floor is vital. Irregularities can cause stability and aesthetic issues. Using spirit levels or masonry rules to ensure a flat surface is recommended. Taking this step seriously ensures that the tiles will be laid uniformly and will provide a professional look.
In summary, adequate floor preparation is a sine qua non condition for a successful carpet tile installation project. This helps avoid many inconveniences that could arise later, both aesthetically and functionally.
A precise assessment of floor moisture is essential before installing carpet tiles. Using a hygrometer can help ensure that the surface has acceptable moisture levels, which is crucial for the longevity of tile adhesion.
Adding an underlay can also help improve tile adhesion, while providing cushioning and reducing noise. Choosing a material suitable for the needs of your space can greatly influence the longevity and comfort of the carpet.
The choice of carpet tiles should be made considering various criteria, including aesthetics, comfort, and the use of the space. It is important to consider the color, pattern, and texture to ensure that the carpet harmonizes with the rest of the interior décor. Furthermore, it is essential to think about the location. For example, high-traffic areas require tiles that are more resistant to wear and easy to clean.
Another dimension not to be overlooked is the acoustic factor. Some tiles are designed to absorb sound and reduce ambient noise, which can be beneficial in offices or common areas. There are also options that provide good thermal comfort, particularly useful in cold regions.
Additionally, it is recommended to check the ecological characteristics of the tiles, including their composition and environmental impact. Choosing sustainable carpet can be an excellent choice for both comfort and the planet. Look for certifications that guarantee their quality and environmental respect.
Finally, the budget should not be forgotten. It is wise to compare prices and evaluate the cost-to-quality ratio of different types of carpet tiles to make an informed choice that suits your space and needs.
By considering the use of the room, you can steer your choice towards tiles that meet specific requirements. For a bedroom, for example, a soft and welcoming carpet would be appropriate, while an office may require more durable tiles.
It is advisable to evaluate the maintenance level required for each type of tile. Some tiles may require more frequent cleaning or specific products, while others are easier to maintain. Opting for easy-to-clean tiles can significantly reduce long-term maintenance time.
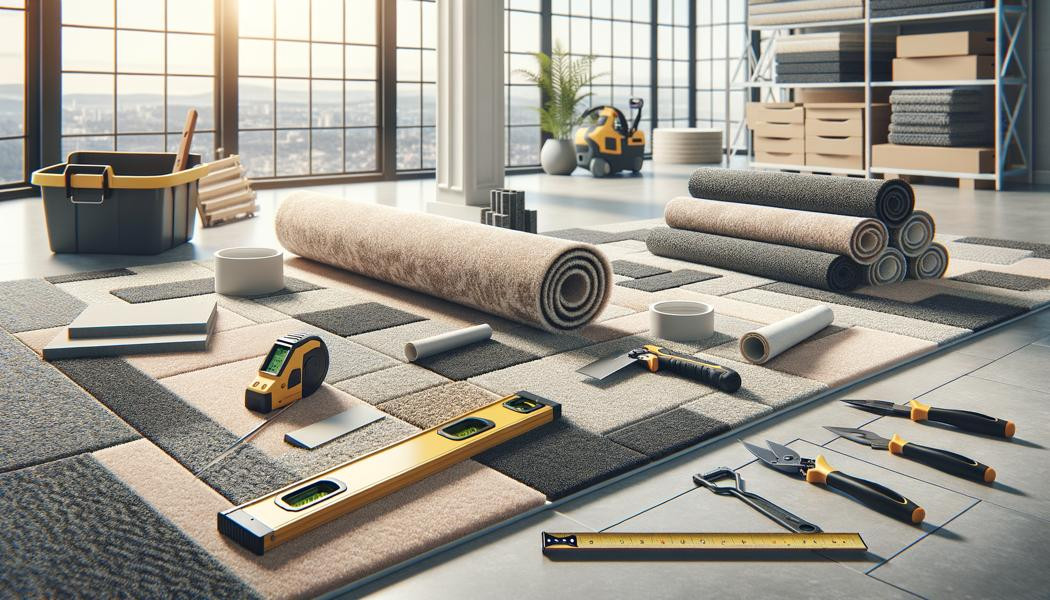
A successful installation of carpet tiles relies on several clear steps. First, it is essential to ensure that all necessary supplies are on hand before starting. This includes, of course, the carpet tiles, but also adhesive, cutting tools, as well as a level and a tape measure. Planning your installation approach is also crucial; determining a "starting point" for installation ensures that the tiles remain aligned.
Next, it is important to create a drawing or visual plan of the tile layout to ensure that aesthetics will be appealing. Taking the time to sketch your plan can avoid many mistakes during the actual installation.
At the time of installation, it is advisable to work in sections. This helps maintain focus and ensures that each tile is properly adjusted before moving on to the next. Applying the correct adhesive according to the manufacturer’s recommendations is crucial, and ensuring good ventilation is also recommended during the process.
Finally, once all the tiles are laid, it is essential to check the alignment. A meticulous check at the end can prevent further adjustments. It is also beneficial to allow the tiles to rest without walking on them for a recommended period to allow the adhesives to dry properly.
Adopting recommended installation techniques, whether tessellated or staggered, is crucial for ensuring good adhesion and a professional appearance. Mistakes in installation can easily be avoided by adhering to these standard techniques.
Once the installation is finished, it is advisable to conduct a final check to ensure that all tiles are correctly aligned and secured. This will allow you to detect any imperfections promptly.
Humidity is one of the main enemies when installing carpet tiles. To avoid such problems, the first step is to measure the moisture content of the floor using a hygrometer. This will ensure that the moisture level complies with recommended standards before starting any installation.
In cases of high humidity, it may be useful to let the floor dry or use screens or membranes that act as barriers against moisture. Preventive treatment is not only wise but often essential to reduce the risk of mold growth after installation.
Furthermore, using waterproof materials in areas that may be exposed to puddles or recurring moisture ensures better carpet protection. Do not neglect high-risk areas, such as basements, which require special attention when managing moisture.
Lastly, after installation, it is pertinent to continue monitoring moisture levels and ensure that the room is adequately ventilated. Dehumidification equipment may be necessary in environments where humidity is persistent.
Investing in carpet tiles specifically designed to be water-resistant can prove to be very beneficial. These tiles are made from treated materials, which may include protective coatings, and are well-suited for high-moisture areas.
Ensuring good ventilation in the room where the carpet tiles are installed is essential. Keeping windows open or running fans can help reduce accumulated humidity and maintain a healthy environment.
Having the right tools is crucial for a successful installation of carpet tiles. First and foremost, a quality carpet knife is essential for precise, clean cuts. It is also recommended to have carpet scissors for detailed cutting. Additionally, a pressure roller helps flatten the tiles, ensuring better adhesion.
Regarding materials, the appropriate adhesive is essential. Depending on the type of tiles chosen, it may be necessary to opt for a specific adhesive, whether it be water-based or specialized for modular tiles.
A spirit level for checking alignment and a tape measure for precise measurements will also be very useful. Lastly, gloves and a mask can provide protection during installation, especially when applying the adhesive, for your safety.
Using these tools and materials will help ensure a clean and successful installation of the carpet tiles. Taking the time to gather everything necessary before starting the process can only benefit your project.
Maintaining an organized workspace contributes not only to safety but also facilitates project progress. Storing tools after use prevents clutter and reduces the risk of accidents.
Finally, while a limited budget may restrict some choices, invest in quality materials to ensure the durability of your installation. Choosing your tiles and adhesive wisely will have a direct impact on the long-term results.
Rectifying a poorly executed tile installation can seem daunting, but it is often achievable with some simple strategies. First, if there are significant misalignments, it may be necessary to remove the tiles in question and reposition them after checking adhesion and alignment.
For lumps caused by improper adhesive application, carefully lifting the tile and reapplying the adhesive may suffice. It is also advisable to use a pressure roller to flatten the area and eliminate air bubbles.
If edges are lifting, applying a small amount of adhesive at those specific spots and holding them in place with a weight until the glue sets can be helpful.
In cases where tiles have deteriorated, it may be necessary to replace them. Removing damaged tiles and substituting them with new ones restores the aesthetic and quality of the installation. Don’t hesitate to seek advice from your supplier for recommendations.
Ensuring that tiles are well aligned and correcting the lines can significantly improve the appearance. This sometimes requires carefully lifting the tiles, but the result is often worth it.
Technical fixes using additional adhesives and weights to keep edges down can often provide temporary solutions. Depending on the severity of the corrections needed, these measures can prolong the life of your installation.
Proper planning before carpet installation should not be overlooked. In fact, it is one of the first steps towards the success of your project. Detailed planning allows you to visualize the space, identify specific needs, and avoid potentially costly mistakes.
This involves considering the style and patterns of carpet that will play a role in the overall interior design. Accurate dimensions and placement schematics ensure you are prepared before starting the installation.
Moreover, careful planning helps anticipate the time and resources needed, which can boost your confidence to proceed. Having a clear timeline helps manage the project and meet deadlines.
Finally, planning also prepares you for any potential issues that may arise during installation. Knowing what to expect allows you to have solutions in mind and approach installation with a calmer attitude.
Establishing a project timeline allows you to know what stages you need to stick to and provides useful tracking throughout the process. It also allows you to evaluate how long each stage will take and helps you meet those deadlines.
Immersing yourself in your project and envisioning the space once completed can help you spot potential imperfections and resolve issues before they arise.
To properly align carpet tiles, it is strongly advised to start with a reference line. Using a chalk line or a spirit level can help ensure that the first tiles are laid in a straight line. This provides a solid foundation for the subsequent tile installation.
Use visual markers at certain intervals to help you stay aligned as you progress. This practice helps avoid long-term alignment errors that can be unpleasant later.
Additionally, do not hesitate to check alignment regularly during installation. Frequent checks allow you to make adjustments in time, contributing to a uniform final result.
Finally, know that a good fit is more effective when tiles are pressed tightly together using a pressure roller for a uniform and neat finish.
Using tiles from the same batch can help keep color and pattern consistent throughout the installation. This helps avoid variations in pattern and ensures that the tiles align perfectly.
Taking regular breaks to step back and look at the overall progress can be very beneficial. This can give you a different perspective and help you see if any alignment errors slipped in along the way.
To ensure that the carpet tiles are well fixed, it is important to strictly follow the manufacturer's recommendations regarding the adhesive. Generally, ensuring adequate pressure during installation is essential. Using a pressure roller along each tile helps ensure that they adhere properly to the floor.
Furthermore, checking the edges after the adhesive has dried is a good practice. Ensuring that the edges are well glued and that there are no deformations will allow you to see if a tile needs to be reworked.
Allowing proper drying time is also crucial. Generally, following the drying time recommended by the manufacturer can help avoid adhesion problems later on. Also, be sure to avoid walking on the laid tiles during this period while the adhesive sets.
Finally, a final inspection after complete drying is advised. This can reveal areas where additional adhesive reinforcements may be necessary and ensures that each tile is in place.
Monitoring climatic conditions can also play a significant role in the longevity of adhesion. Ensure that the temperature and humidity of the room match the installation recommendations.
In some cases, it may be useful to use clips or weights on the edges of the tile to ensure they stay glued down until the adhesive sets completely.
The aesthetics of the carpet tile installation project are very important. The first tip is to take care to choose the tiles well, whether it be models, patterns, or colors, as this will impact the final result. Ensure that all tiles are from the same batch to avoid potential color or texture distinctions.
When installing, take the time to position the tiles while considering the natural light from the windows. Patterns can be accentuated or softened depending on the light, so a good choice of direction can work in your favor.
Additionally, attention to the finishing of the joints between tiles is essential. Accurate and clean alignment is key to a beautiful presentation. Using a masonry rule or a cutting guide can help keep straight lines.
Finally, take the time to clean the tiles once completed to ensure that any dirt or dust is removed, providing a fresh look to your space.
Considering how light will affect your carpet choices can truly enhance the final aesthetic. Positioning lighter tiles in well-lit areas creates an attractive effect.
Finally, do a walk around the room from different angles to ensure that the installation meets your taste. This will allow you to spot areas for improvement before concluding the installation process.
Once the carpet tiles are laid, it is vital to commit to a regular maintenance routine to extend their lifespan. Regular cleaning is essential, whether it be vacuuming regularly to remove dust and dirt.
In addition to cleaning, applying a protective product can help prevent stains and wear. There are specific products for carpet tiles that ensure the fibers remain in good condition.
It is also advisable to schedule deep cleanings at appropriate intervals. Depending on how the space is used, this could be every six months or once a year.
Finally, regularly inspecting the tiles for signs of wear or deterioration is essential. By addressing these issues early, you can take corrective measures before they cause significant damage.
Establishing a maintenance schedule can help keep your tiles in good condition. List the regular tasks and deep cleanings in an accessible calendar to avoid neglecting anything.
Involving the occupants in the maintenance can also foster collective responsibility. By making them understand the importance of maintenance, you ensure a well-kept space.
In summary, successfully installing carpet tiles necessitates a keen attention to detail and adequate preparation. By avoiding common mistakes through good planning and choosing appropriate materials, you can ensure a successful and durable installation. Do not underestimate the importance of regular maintenance to maintain the aesthetics and functionality of your carpet tiles. This guide will accompany you throughout your project, from the initial stages to post-installation maintenance.
Whether you need quick assistance or want to offer your services, Helplease is your solution! Download the app to access qualified experts or find clients with a click, simplifying your daily life! Available on iOS and Android!