
Coating a wall is an essential step for any renovation project, both aesthetically and practically. Indeed, a well-coated surface can transform the appearance of a room and ensure its longevity. However, accomplishing this task to achieve a flawless professional finish can be complex without the right advice. This article will guide you through the various aspects of wall coating, including its importance, the types of coatings available, as well as some tips and tools to successfully complete your coating project.
Need help coating a wall? Quickly find a qualified provider on Helplease and benefit from a tailored service to meet all your needs. Discover professionals near you!The coating of a wall plays a crucial role both aesthetically and practically. Indeed, a well-coated wall prevents moisture from seeping in, thereby protecting the structure of the house. This protection contributes to the longevity of the walls and reduces the risk of serious issues such as mold or cracks.
Moreover, the coating provides a uniform finish that significantly enhances the overall appearance of the room. Coated walls can easily receive paint, making it an ideal solution to refresh an interior without heavy work.
Furthermore, good coating work increases the real estate value of a property, as buyers are often impressed by the neat appearance of walls. Investing in coating work is therefore a beneficial long-term action.
Finally, it is important to note that applying a coating requires technical skills. Ignoring best practices can lead to surface defects, making the wall more vulnerable and less aesthetic.
A quality coating protects the wall from damages, especially by preventing moisture.
A well-coated wall offers a perfect finish, ready to be painted or decorated.
There are a multitude of coatings on the market, each with its specifics and uses. Plaster-based coatings are traditional and perfectly suitable for indoor use. They offer a smooth finish and uniform surface, ideal for painted surfaces.
Lime-based coatings, on the other hand, are prized for their ability to regulate moisture, making them a wise choice for humid rooms like kitchens and bathrooms. Their durability makes them a product often used in historic renovation projects.
Acrylic coatings are also very popular, especially outdoors. They provide excellent protection against the elements and are easy to apply. Available in a wide range of colors, they cater to various aesthetic needs.
For specific applications, such as textured finishes, effect coatings can be used to create artistic surfaces. These techniques are highly appreciated for adding a personal touch to interiors.
Offer a smooth finish, ideal for paint layers.
Favor humid areas and effectively regulate moisture.
Before starting the application of a coating, it is crucial to properly prepare the surface of the wall. The first step is to clean the surface by removing all dust, dirt, or old paint that might hinder adhesion.
Next, it is recommended to repair any cracks and imperfections. Using a repair putty can help ensure a level surface, which is essential for optimal final results.
After this repair phase, it may be necessary to apply a primer in some cases. This improves the adhesion of the coating, particularly on porous surfaces.
Once these steps are completed, ensure that the wall is completely dry before proceeding with the application of the coating to avoid moisture issues that could compromise the result.
It is essential to remove all impurities that could prevent the coating from adhering.
Cracks and other defects must be corrected to prepare the surface for coating.
Preparing the surface is a crucial step to ensuring successful coating. It all starts with a thorough cleaning where using a vacuum and a brush is recommended to eliminate all dust and dirt.
If necessary, a wash with soapy water may be required to degrease particularly dirty surfaces. Once the wall is sanitized, inspect it thoroughly for any cracks or holes, which you should fill with appropriate putty.
After repairs, allow the putty to dry before moving to the next step, as a damp surface can compromise the application of the coating. In cases where the wall is very porous, applying a primer is good practice to optimize the coating's adhesion.
Finally, ensure that the wall is dry and level by running your hand over the surface before starting the coating application. This guarantees a better finish.
These tools help remove all interfering elements from the coating application.
A careful check helps identify the areas needing repairs before application.
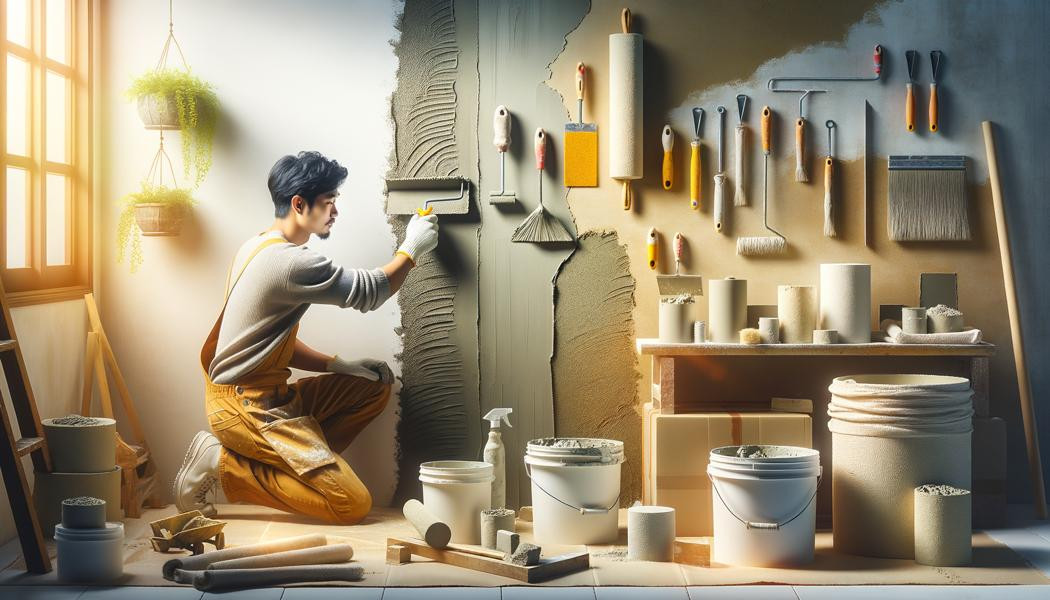
To coat a wall professionally, the choice of tools is decisive. First, choosing the right trowels and spatulas will allow for an even application of the coating.
A float is also indispensable for smoothing the surface and achieving the desired finish. Remember to have containers for mixing the coating and a tray to facilitate its application.
For large surfaces, a coating roller can be used. It allows you to quickly cover large areas with a professional finish. It is also essential to have ladders or a step stool to reach high areas.
Finally, do not neglect safety equipment, such as gloves, a mask, and goggles, to protect yourself during application.
Useful for the uniform application of the coating on the wall.
Ideal for large surfaces, facilitating and speeding up application.
Applying the coating requires a certain technique to avoid imperfections. Start by mixing the coating according to the manufacturer's instructions, to achieve a homogeneous consistency.
Apply the coating starting from the bottom of the wall and moving upwards vertically. Use a float for better adhesion and smoothing. Once the first coat is applied, allow it to dry according to recommendations.
Once the first coat is dry, you can apply a second coat if necessary. Use the float for a final smoothing, ensuring that the coating is well distributed to avoid air bubbles or other imperfections.
Finally, after complete drying, check that the surface is smooth to the touch and ready to receive paint or other finishes.
Applying from the bottom up ensures effective coverage without streaks.
Running your hand over the surface after drying helps ensure a good, smooth finish.
The drying time of the coating varies depending on the composition of the coating itself and ambient conditions such as temperature and humidity. Generally, a coating can take between 24 and 48 hours to dry completely.
To optimize the drying time, ensure that the room is well ventilated. Opening windows or using fans can reduce wait time. Also, avoid applying the coating in humid conditions, as this can prolong drying time.
Finally, be careful not to paint or apply finishes until the coating is completely dry. This would prevent adhesion issues and air bubbles under the paint.
If in doubt, consult the manufacturer's information on the recommended drying time.
Improving air circulation helps speed up drying.
Avoid applying the coating when humidity is high.
Despite all the care taken during the application of the coating, imperfections may appear. Do not be discouraged, as there are solutions to correct them effectively.
For minor imperfections like bubbles, you can use a spatula to flatten them once the coating is dry. For more significant defects, additional coating can be applied on top and smoothed with a float.
Once corrections are made, allow the coating to dry again and, if necessary, use fine sandpaper for a neat finish.
It is crucial not to paint or apply finishes before being satisfied with the surface. This could mask imperfections and compromise the final aesthetics.
This allows for sealing imperfections without dismantling all previous work.
An essential tool for refining the surface before any finish.
The choice of color and finish for the coating is just as important as its application technique. When selecting a good color, consider the ambiance you want to create in the room. Light colors can visually enlarge the space, while dark shades bring character.
Also, consider the natural brightness of the room. It is better to test several color samples on the wall before making a final decision. Samples allow you to see how the color interacts with different light sources.
In terms of finish, you have the choice between matte, satin, or glossy finishes. Matte finishes are ideal for imperfect walls, while satin or glossy finishes reflect light and can add a more modern and dynamic look.
It is advisable to inquire about the best finishing paints compatible with the coating you have selected, to guarantee a beautiful final result.
Visualizing the shades on the wall helps choose the one that fits best.
The finish also influences the appearance and durability of the coating.
When coating a wall, certain mistakes can undermine the final result. One of the most common is failing to properly prepare the surface, which can lead to poor adhesion of the coating.
Another pitfall to avoid is working in unsuitable weather conditions. A wall too humid can compromise drying and finishing.
Don't underestimate the importance of patience. Applying coats that are too thick can lead to irregular drying and cracking.
Finally, ensuring good ventilation is essential. A poorly ventilated room can delay drying and promote the appearance of mold. By avoiding these mistakes, you maximize your chances of achieving a perfectly coated wall.
Always ensure to clean and inspect for a flawless result.
Taking your time ensures good smoothing and adequate drying.
Maintaining a coated wall is essential to ensure its longevity. Start by regularly checking the condition of the surface to spot any cracks or water ingress. If any failure is detected, repair immediately to avoid more significant damage.
For cleaning, use a mild product and avoid abrasives that could scratch the surface. Regular maintenance will prevent dirt buildup and facilitate the use of appropriate solutions.
If you notice that the color of the coating has dulled over time, consider a new layer of paint to refresh its appearance. Adequate protection against moisture is also critical to prevent mold growth and ensure a healthy wall.
Finally, remember that ambient temperature and humidity can influence the state of your wall. Be cautious in these conditions and maintain a stable atmosphere inside your home.
Frequently inspecting helps detect issues before they worsen.
Use non-abrasive products to preserve the integrity of the coating.
The costs of coating a wall can vary significantly depending on the type of coating used, the area to be covered, and labor costs. On average, the price can range from 10 to 30 euros per square meter, including materials and labor.
To reduce expenses, consider doing the work yourself if you have the required skills. This allows you to save on labor costs, but it also involves a time investment.
Another way to optimize costs is to choose a less expensive coating that meets the needs of your project. For example, favoring plaster-based coatings for interior walls or acrylic coatings for the exterior can save you money without compromising quality.
Finally, consider comparing material prices from different suppliers. Sales or bulk purchases can also lighten your budget.
Doing the coating yourself can lead to significant savings.
Some products offer good value for money without sacrificing results.
Coating a wall requires skills, appropriate tools, and particular attention to detail. Each step, from surface preparation to application, as well as choosing colors and finishes, contributes to ensuring a professional result. By avoiding common mistakes and following the provided advice, you can transform your walls and give them a beautiful look while protecting your home from damages. Investing in coating work is not only beneficial for aesthetics but also for the durability of your interior.
Whether you need quick help or want to offer your services, Helplease is your solution! Download the app to access qualified experts or find clients in one click, and simplify your daily life! Available on iOS and Android!